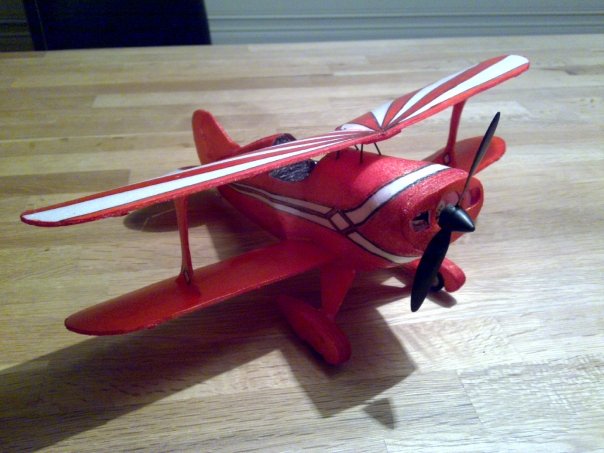
Micro Pitts
I decided to try out Chris O'Riley's Micro Pitts plans. I think it is a fabulous looking plane for it size, but it is a little bit difficult to build because of its size. The plans are for balsa wood, but I decided to use chips container depron. That worked quite well, and have since been used for many tiny RC airplanes I have built.
Pictures and my review of the model.
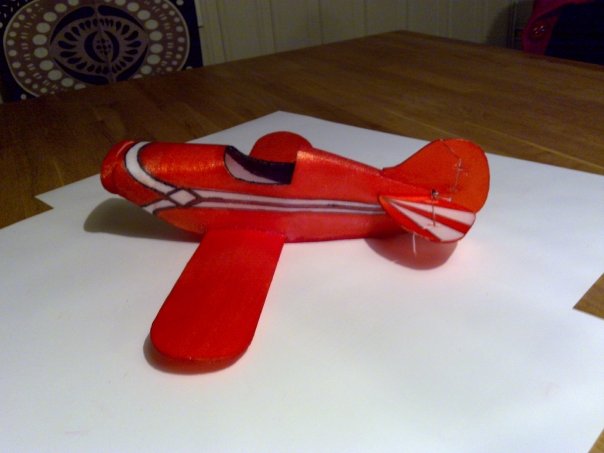
Micro Pitts - 30cm wingspan.
Pictures and my review of the scratchbuild.
Chris O'Riley Micro Pitts plans can be downloaded here: http://www.chris3d.com/files/micropitts.pdf
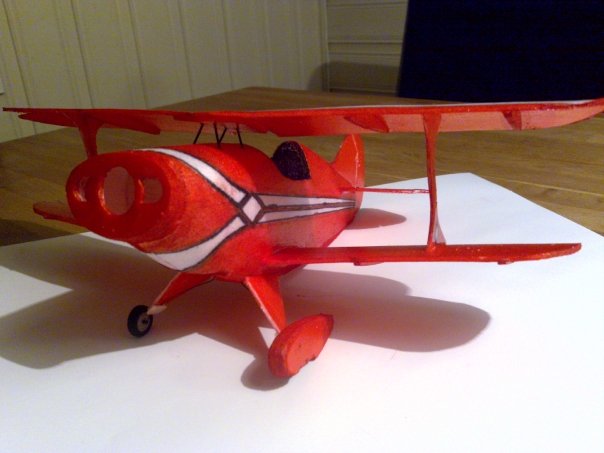
Wingspan of 30 cm makes this plane very small, but also a very tempting project.
A flying model of this one can be seen here:
http://www.youtube.com/watch?v=TuIq5ri8wVs
And I have recently found depron building instructions here:
http://www.docu-and-info.de/manuals/pdf/pitts-micro.pdf
The instructions indicated that this is an easy build. I have found it not to be.
Plans are for 1/32" balsa sheets. I have an idea to make the plan of
depron, and I believe an excellent source of depron
for this build can be found in food containers. So off we went to the
Grill to get 10 containers. The foam in these are
made of Depron, and the thickness are around 1 to 1.5mm which is very
much suitable for such a build.
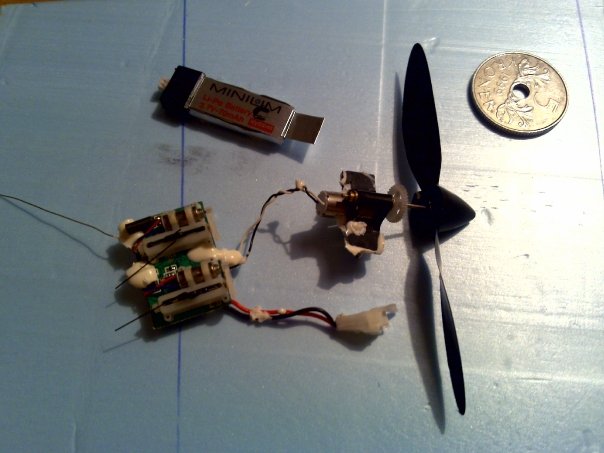
Finding radiogear which weighs around 9 grams,
where the whole plane with all included should not be heavier
than 18 to 20 grams is difficult.
One will often have to go to expensive micro receivers, lipos and actuators.
If you however knows someone who has a Kyosho Citabria which is in need
of a wing and tail elevator, the cheapest way to find less than
9 grams 3 channel rx/esc/servoes and lipo battery
is to buy the broken plane and use the radio system from it.
So the non flying plane of my mate which was in need of parts
have been purchased to be used as hardware for the micro
Pitts.
And best of all, it comes including a lipo
charger for the three flight batteries, spare props and a 2.4Ghz 3 channel tx.
Just removed the hardware from the Citabria
and put it on the scale. The two servos on the receiver and motor control
(ESC) including the motor, gearbox and 70 mah
lipo battery clocks in at 8,5 grams. Two pianowires
and wheels with undercarriage is 0,5 grams.
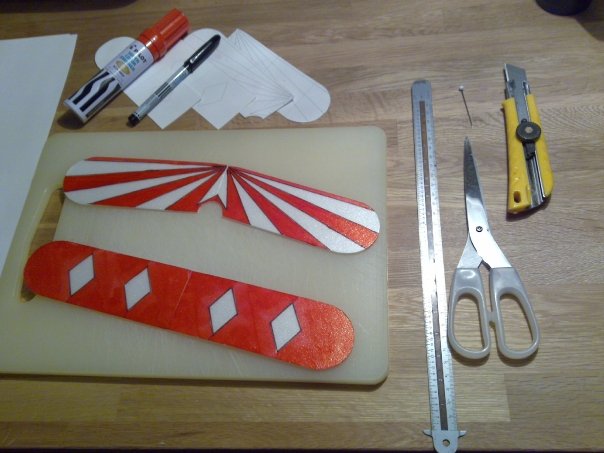
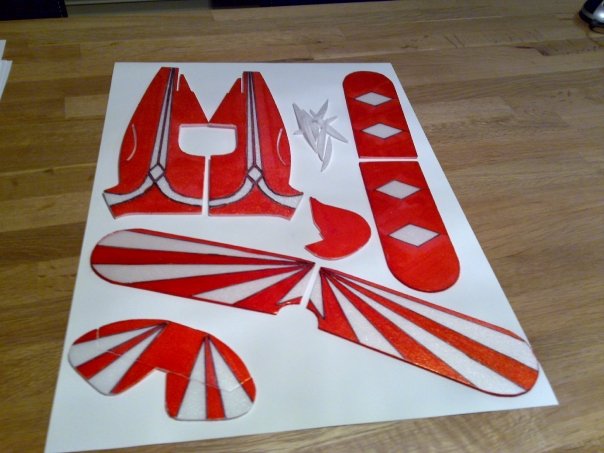
Started cutting the foam and used permanent markers as decoration.
Works like a charm.
I had the plans printed on thick paper at work 140 grams paper) which
I then cut out to make templates. (visible under the markers in
the top) I use the templates and a steel ruler to cut the
depron in shape. Rounded cuts can be difficult to get even,
but depron is excellent since it can be
sanded. So shaping the parts are actually
rather easy.
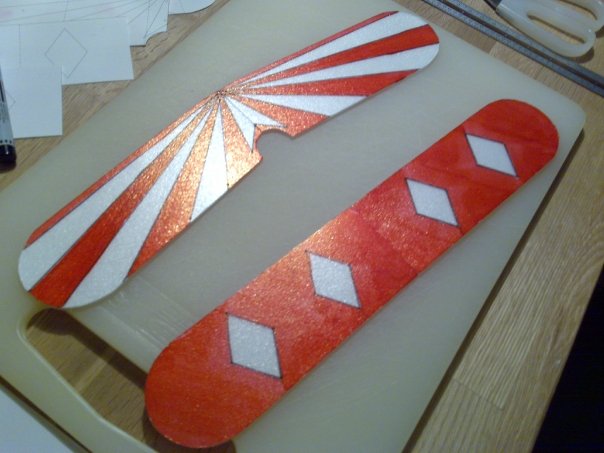
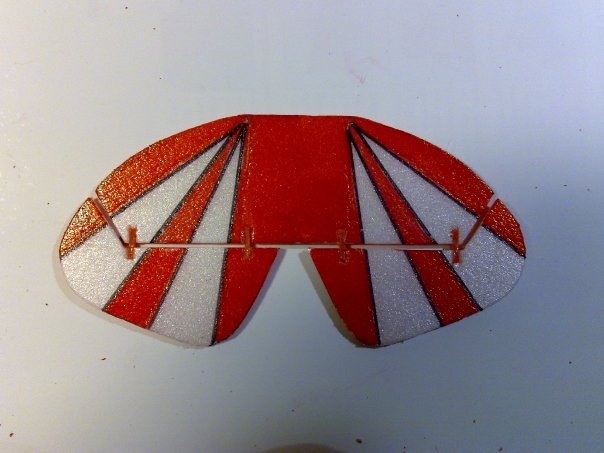
Wings are cutted and decorated. I havent cutted the
ribs to be glued underneath yet. But since there are only four
very very small ones I think the scale will show 4 grams only for all wings.
Initial weighing today shows 1 gram per wing surface with decoration.
(Using permanent markes add virtually no weight)
Looks good and till now it is actually promising to end up around 12 grams
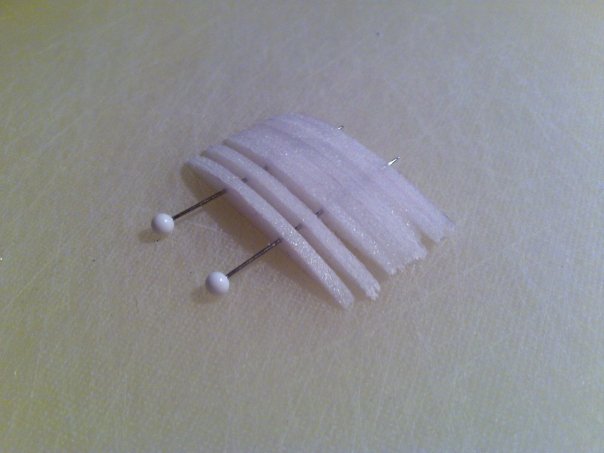
Making ribs the same shape and size when they are 55mm long and 6mm high is
impossible by just cutting depron with a knife.
I dont have expensive CNC
equipment for cutting depron, so I had to
fall back on basic Balsa building skills. With balsa I cutted
the ribs as best as I could, and then pinned them together and sanded
the surfaces smooth on each side. With this, the ribs
was exactly the same size and shape.
Works also perfectly with depron, reusing a learned trick of my fathers model building there.
Quite a few more parts made, and only the boring stuff is left to make.
Internal firewalls, ribs and spacers.
All incredibly small and complicated to cut.
But I think the work with be worth it. Already now I can see the outline
of a very cool plane!
Weights so far are:
Wing halves, 1 gram each = 4 grams
Fuse sides, 1,5 grams each = 3 grams
Stabilizer and elevators, 1 gram
Fin and rudder 0,5 grams
The large parts = 8 grams in total. So maybe the 12 grams
goal is not out of reach.
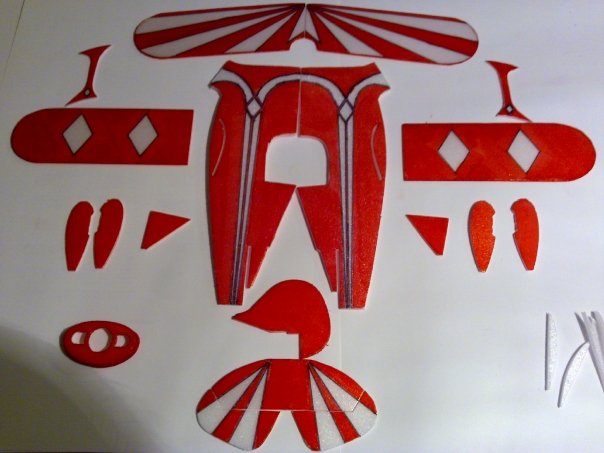
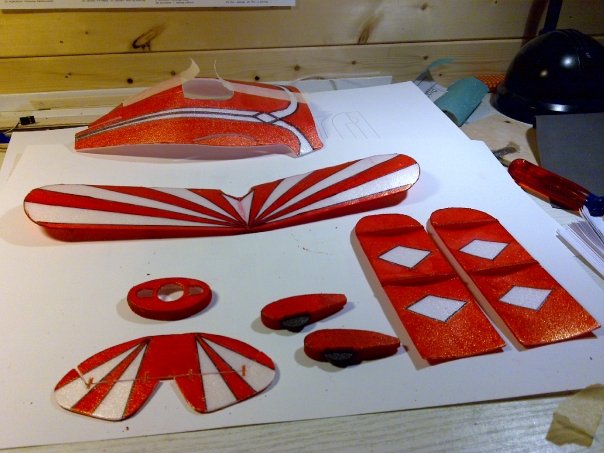
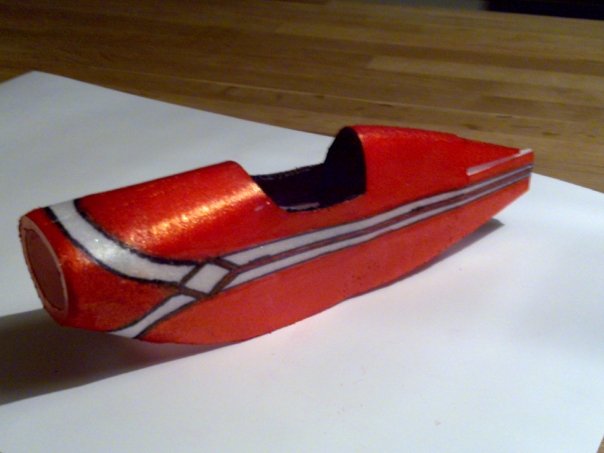
(Almost) All parts are cutted, most are decorated, and some even mounted
The build has started, and you can see the
nose cone in the left side as the parts first glued.
Fiddly work this, cutting small small parts, some just a few millimeters large.
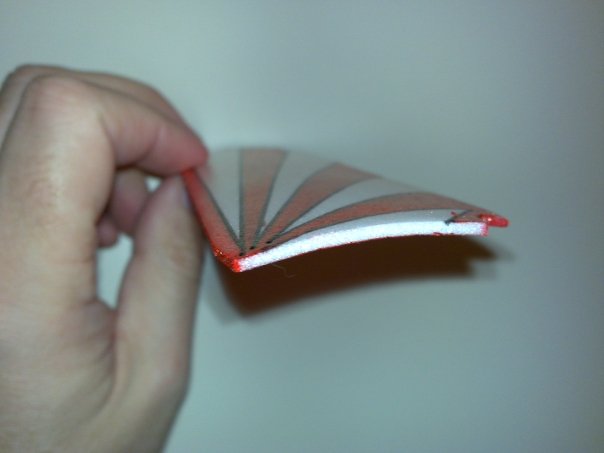
Bending depron like this is neccessary for wing surfaces. I have till
now, sanded the shape of the wing, it is easier and more predictable.
This tiny build uses 1.5mm depron, and well,
there is nothing to sand. So bending was the only option. Testing with
"rolling" the depron over a rounded
surface showed that this particular depron
beam flimsy and "broken". Basically the air bubbles
inside cracked, and the stiffness was lost.
Then the only option is to use heat. But depron
looses shape very quickly in heat, so it is tricky.
In my experience and from what I have read the heat need to be between
70 and 90 degrees celsius. More than this
and the depron curls
and less than this and the depron cracks.
I did not have patience to use 70, so my guess was that our oven was
set around 90+
There is a set of 4 images at the end of this album which show how I
rounded the wings over a big mug. Any smooth surface which can take
the heat from the oven will do. I used a ceramic mug.
I can say straight away, that this build is not of the easiest.
Wings are a breeze, so also the stabilizer and rudder along with wheel
pants and so on.
The fuselage is impossible to build from the plans
which is made for balsa, I have struggled back and forth with
the two parts but not succeeded to form it.
The stabilizer and rudder are easy to make, as hinges I use small pieces of
rubber band and it seems like a good idea. Rubber band
are very flexible and seems to be able to bond to the UHU
Por glue I am using.
Experience over time have proved that rubber band hinges are durable, strong and
good looking on small models.
I am not certain if I am able to build it with such stiff depron...
but we will see. The barrel and turtle back are very very
complicated to get right. So I might go for a different way of making
the turtleback.
Wheels are made of black depron mounted on
a dremel and spinned against sandpaper.
Seems ok, but will require a boss in the center to roll perfectly. Somewhere
I have some plastic tubing which I will glue in with a drop of epoxy.
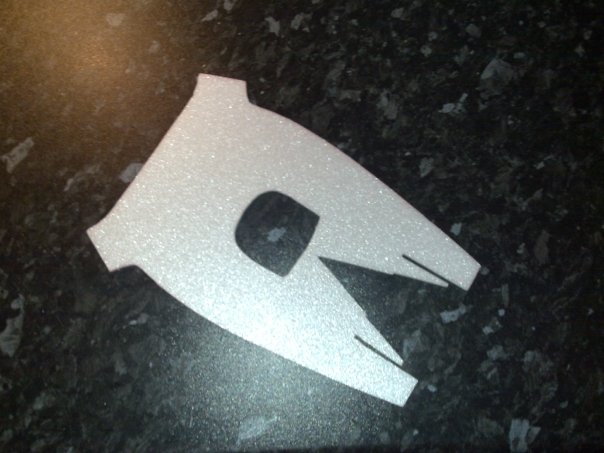
The first two fuselage sides glued together ended up in the bin. I were not
able to bend and roll the depon into shape,
glue is to weak it was basically impossible
So I tried again making the sides as one piece, to try to "roll"
and flatten the pieces which need to be rounded as nose.
This piece of depron is approx 20 by 9 cm btw.
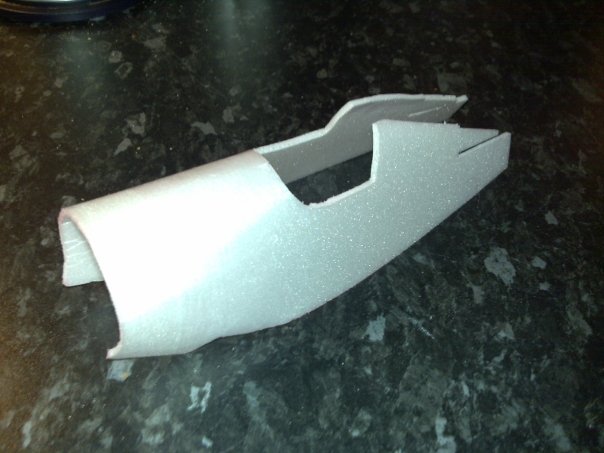
Some small cracks thee is, but not so much I cannot
use the piece. I have earlier written that the body is a very
difficult to make, and I will say it again. I spent 30
minutes rolling and bending using heat to get this shape...
Anyway, as a recap I recommend adding tape on the outer side which is
to be rolled into shape. it will crack less
and be easier to roll.
To the barrelback I will add two stringers of
depron between the sides and sand it to shape.
It will add some weight, but shaping the tight bend in the
depron there is for me impossible.
Now I will glue and tape the fuse in shape and start installing the
ribs and firewall in order to make it stable.
Complete, and good it is... Trust me, I will not make
this fuse again... (at least it feels like
this now)
The fuse is 5 gram, 20 cm long appox,
and took a little over 3 hours to make.
it consist of 4 parts...
Anyway, even if the fuse is not perfect, it
is good enough. Not without cracks, but they are not visible anymore,
since they are glued.
Had to add the decor on the fuse after it was built. Which meant a lot
of handpainted items... and it looks like that.
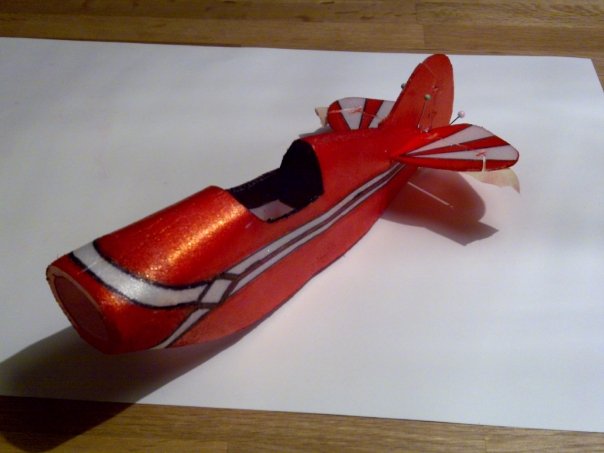
Fuse wih mounted stab and rudder. These are epoxied
in place, so building commences till tomorrow when the glue is dried.
Fuse are a wee bit twisted, but the bottom
plate is still missing and I have verified that gluing that correctly
will straighten the plane.
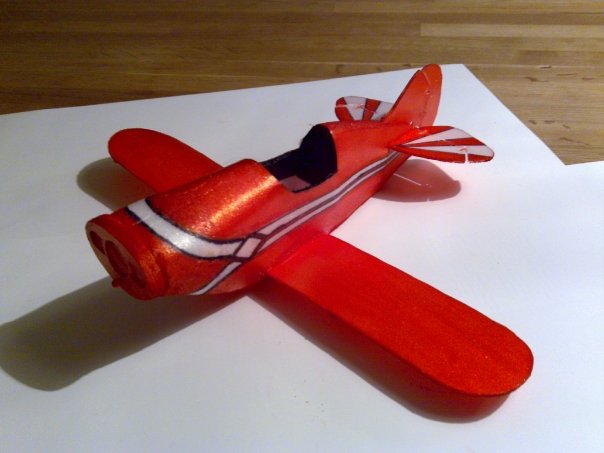
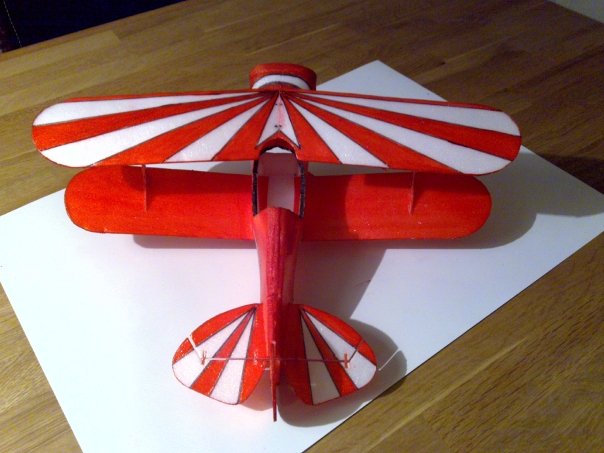
The plane is slowly beeing assembled. No problems after the fuse was made. Alignment and keeping everything straight problems as usual when working with depron, but apart from that, all is fine. I added structual strength to the wing mounts more than the plan, which I believe will do good to the plane. It add a little weight, but not much.
These Pitts are very nice planes, no doubts about it. So also this tiny one!
The fuse is now complete and covered underneath. Next task will be to
add motor, radiogear, undercarriage and control horns/pushrods.
The total wheight of the mounted parts and the unmounted
parts are actually 13 grams! Somewhat incredible actually....
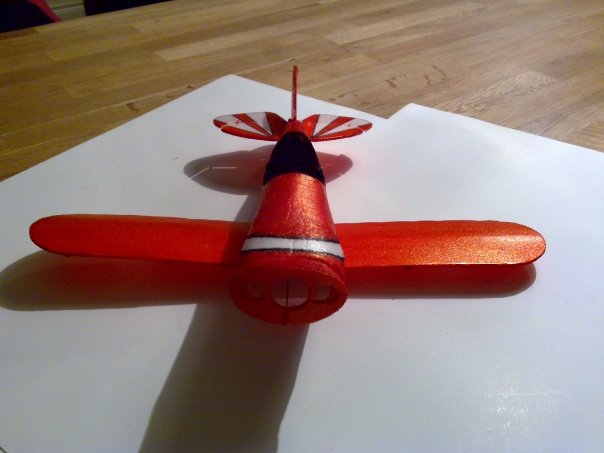
the build is very stiff, and my guess is that what you see on this picture
will survive anything. The top wing might be shed in a crash, since
it stands on pins only.
But as it is now the plane is 9
grams, and even if it will not survive me sitting on it... it really
feels sturdy and strong!

Top wing and cabane struts are mounted. I lamiated
the cabane strust
with Tesa film, and poked a 0.6mm carbon rod
through them for strength.
A top wing will always be prone to shed in a crash, but adding carbon
and laminating will at least add strength.
The 4 central struts which the wing is connected is
also carbon rods which are epoxied in the
fuselage and through the wing. I think it will be strong and light.
I am rather happy with the result, for
depron to be, the wings and fuse are resonably
straight. Depron is not the best of materials
when trying to achieve a perfectly beveled and straight build.
The buiild as it is now is approx 13 grams and this includes the
undercarriage and wheels.
Putting the wheel pants on the scale makes it tip to 14 grams.
This means 22,5 grams total flight wheight. And this is good news!
22 grams and this build will not require much speed to take off and
fly :)
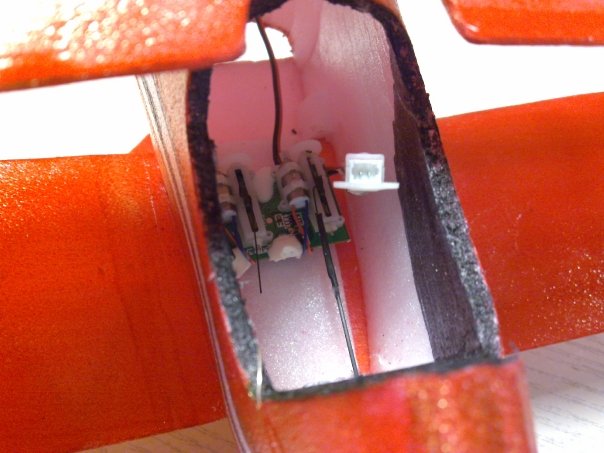
The miniature radio gear has been mounted. One relatively large drop of melt-glue did the trick for that.
Very fiddly to work with this... the opening in the canopy is approx 2 by 5 cm. Inside there my XXL fingers should connect and adjust.
But, now things are mounted mostly and the plane is 19 gram. Add the battery on this and the prop and i guess we are looking at 22 gram. As a comparisment the plane now has the same weight as 3 norwegian 1 KR coins.
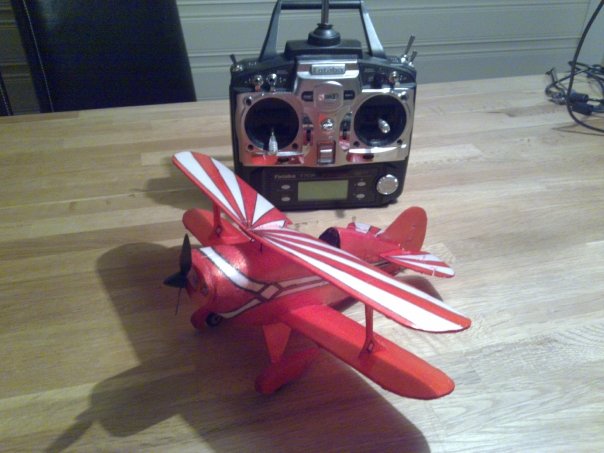
Just for size comparisment, I had to add a DVD cover behind the plane. Most of my planes have wingspan of 140 to 200 cm... so this one with 30 cm wingspan is tiny.
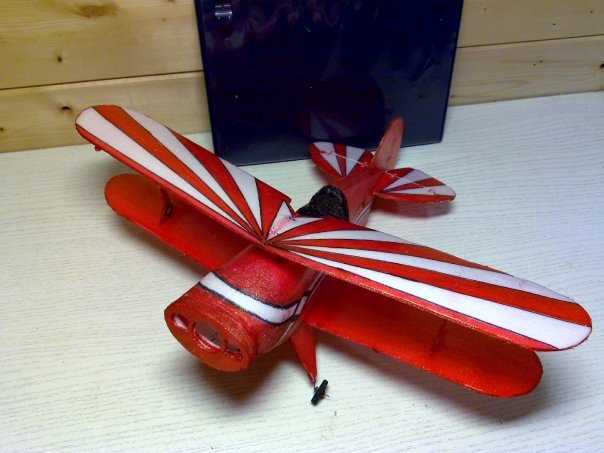
23.5 grams was the final wheight. (approximately the same weight as 5 norwegian 1kr coins. The prop is not faulty mounted btw... it shall be like that: pointing in one direction and downwards.
This plane is so light and have so small control surfaces that the twist of the prop and the pull from it will make it fly up when throttle is added if the motor did not point a little downwards. As it also would fly to one side due to the roation of the prop if not pointing to the side.

The motor i use, seems to be 1 or 2 gram lighter than the one which the plans were designed for, so the CG is approx 4 mm to the rear compared to where it should be. This probably means adding weight to the front, even if I dont like it. I relocated the battery to under the plane, moved as much forward as possible. But i might have to add 1 gram too. Anyway, the battery will be visible under the nosecone, but that is allright. It is a small 70mah one, and it will look ok, even if i really would like to hide it inside.
But wires are short and space is limited. So it will have to be as it is.
For the ones who have a Futaba TX, here you can see the size of the plane.
Done and ready to fly. (If it flies that is, one never knows)
My guess is that it will.... but we will see
UPDATE:
The Micro Pitts flies rather wonderful!
But... it needs a bigger motor with more trust. And since it is a little light up front anyway, adding a bigger motor just means I can take out added weight.
But really, the plane did fly excellent! Very cool indeed. Photos from the flight are very blurry, and nothing to put online. Will try to get better ones next time!
The work with this plane was TOTALLY worth it! It ends up at 23 grams, and i played around with the CG a little. It flies best when the CG is at the LE of the the bottom wing!
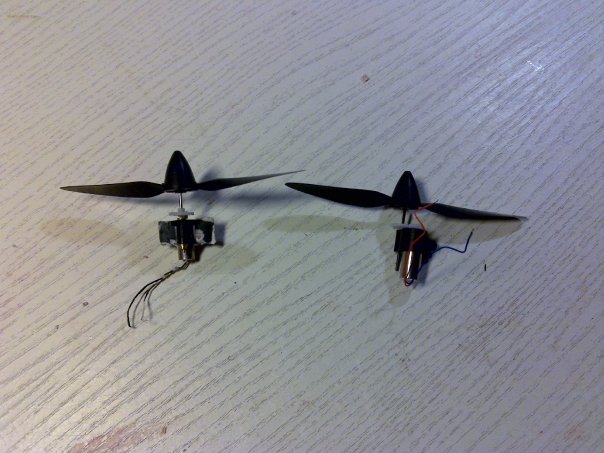
Since the motor from the Kyosho Cessna 220 was to weak to keep the plane flying... A motorswap was needed.
But what to use and where to find? I ended up at the local hobbyshop looking at gearboxes and brushed micro motors, and found the tailrotor gearbox and motor from a Walkera 4#1 (click to see) The motor is 1 gram heavier than the original which suits my Pitts perfectly since it is tail heavy. Also the physical size is almost the same so it will fit perfectly. And best of all it is made for 3.7 volts. The ESC on the Kyosho brick will deliver 1 amp with no problem, and this motor will not superseed that i think.
I have no means to measure pull or prop speed, but for me the pull appears double. This also seems resonable as the size of the new motor is double.
The gearbox is even ball raced and silent compared to the original. I will make a fixture and locate the motor as much forward as possible in order to get the CG perfect.
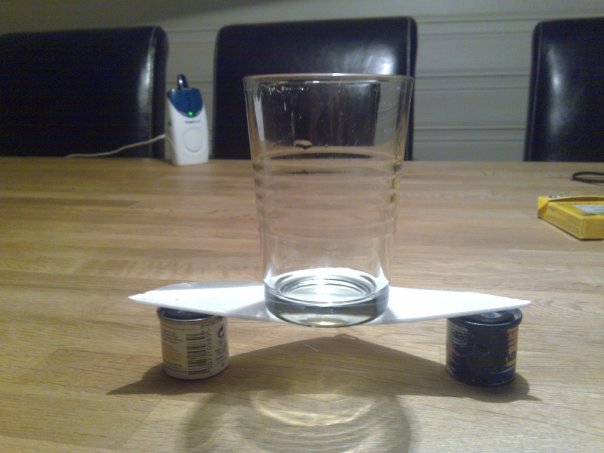
How strong is the Depron in a chips tray?
I wanted to test it. The small metal paint cans under the depron
sheet is normal Humbrol cans. (approx 2 cm in diameter, 2.5
cm high)
The piece of depron on top is a traingular
left over piece, approx 12-15
cm wide and 5 cm on
the widest point under the glass. The width of this piece touching the
small metal cans is approx 2cm.
So you get an idea of the setup.
The glass is a normal 1dl glass which on my scale shows 186 grams!
This small 1.5 mm
thick piece of Depron is actually holding
up 1/5th of a kilo.
Impressive...
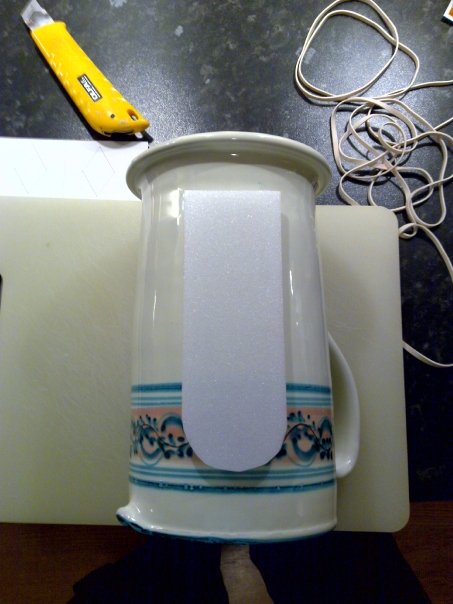
First lay down the piece of depron on the rounded surface. In this image you can see a NEW wing I had to make, since one of the first ones I made and decorated was exposed to high temperature and became mis-shaped. It looked more like wrincled potato chips when it came out of the oven.
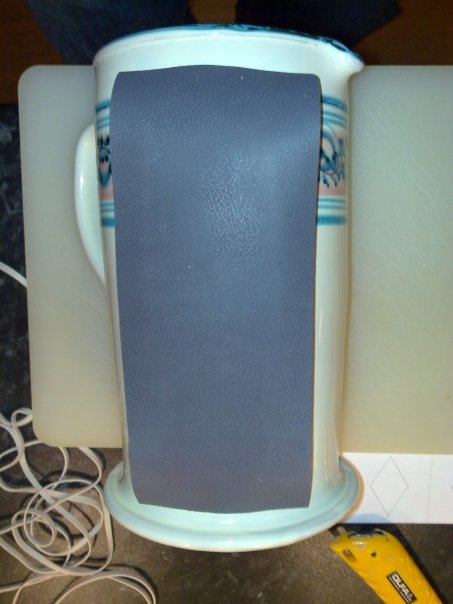
Then put a semi stiff and smooth cover between the
depron and the rubber bands used to "pull" the
depron in shape.
I used a piece of a silicone baking mat we had. (cheap
to buy new, and can take heat up to 250 degrees)
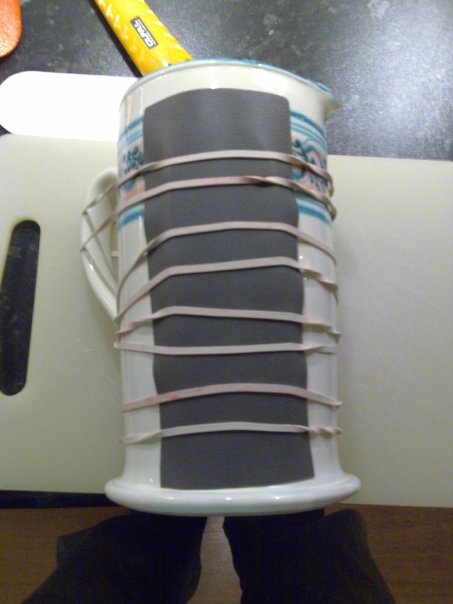
Then a lot of rubber bands over the mat will supply the pressure needed to form the depron in shape when the heat makes it soft.
To many rubber bands and it cracks, to little and it will not be shaped.
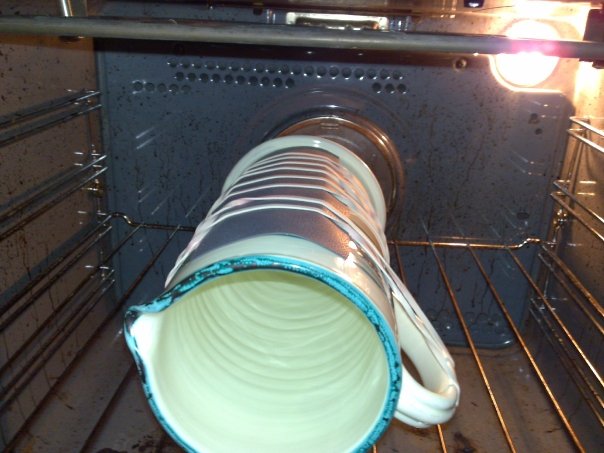
Then into the oven at 90 degrees (or less if you have more patience than me)
You can see on this picture that the depron starts to form itself to the shape of the mug.
For me, 5 minutes into the oven was perfect. More and the depron
was busted, less and the depron was not shaped
fully.
- If you plan to make this model of depron yourself, here is a summary of my experience with it.
- The plan suggest to make the fuse sides in two parts. This works only for balsa, and not depron. No depron glue will hold the joints strong enough when you roll the fuse over the firewall.
- The front of the fuse is rolled in one piece with a join underneath. Depron has one shiny side and one not so shiny. One side cracks easily one does not. Find out from your depron which side cracks easier than the other. Use that side in.
- Tape the outside with masking tape. Masking tape is a wee bit flexible. Then slowly slowly over a rounded edge (my kitchen worktop is great) bend the depron by sliding it back and forth over the edge. I suggest to press the depron with your fingers a lot first in order to make it as flimsy as you can.
- After approx 20 minutes you can slowly start rounding the front of the fuse over the second firewall (make it of balsa!) and when you are able to roll it all the way over, use masking tape to hold the fuse together in the join underneath.
- Then use fingers and apply pressure on the barrel back and form that to a fit. Dont expect to make the barrel back as the drawings. I made a wedge of two pieces of depron and glued between the sides and sanded the top. It adds weight, but I was not able to round the depron in order to glue the top.
- The most of the work is done. Make then firewall number 2 and 3 from the plan. I have to admit I cheated a little and made these 2 miilimeter narrower. This allowed for less rounding the fuse.
- Basically that is it. The firewall number 2 (the balsa bit) you can glue in first. Add Uhu por to the fuse after marking the location of it, and add a film of Uhu por on the balsa. Add Uhu por to each sides of the fuse join underneath.
- Wait 15 minutes and join the fuse by stretching it over the wall. Use tape to hold the bottom joint together. This was not so complicated as I thought, and it went together rather easily.
- Then glue in the two aftmost walls and the front one and you are done