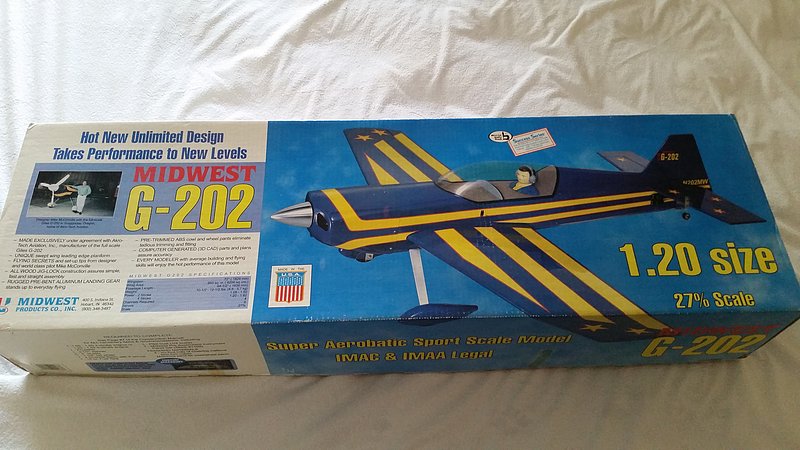
MIDWEST PRODUCTS - GILES G-202 - 120 scale.
Made exclusively under agreement with Akro-Tech Aviation Inc. Manufacturer of the full scale Giles G-202. Flying secrets and set-up tips from designer and world class pilot Mike McConville.
Pictures and my review of the model.
Review:
Initially I want to express that I am not professional model builder, and that what is written here is my opinions only and not expert advice.
The model arrived by mail, and as always it is a special time with the first box-opening. The content looked good, in fact perfect even. All balsa was compatible in hardness and not one part was warped or cracked. All parts was there, and looked perfect in the cutting. I can feel it is very tempting to start building already.
Already after opening the box, one can already grasp the size of the plane. the box is approx 140 cm long, and the nosecone filled 1/3rd of the box... and the canopy took the rest of the length.
The manual is comprehensive, and covers most of the building process and it look already as to be a not so complicated build.
I use mostly 3 kinds of glue for my models. for normal strength, I use UHU Hart balsa glue. This glue need to be applied generously, but has a relative strong joint. Most of the wheight of the glue will also highly reduce when the glue solvent evaporate. And for this reason it is my choice. It can also be sanded very easily. After reading the manual, I might have to look into using CA... but Cyan Acrolate is not nice for eyes... and it is a bit poisonous. We will see if I need it.
When I need a flexible and strong joint, I use outdoor PVA glue. It is cheap and when hardened, it is very strong. The glue is on the heavy side, maybe like epoxy. But can be applied on both foam and wood. It applies white, and clears up to be transparent when hardened. I use a type which on balsa dries in 15 minutes, and is hard enough to hande in 30 minutes. It takes to the next day until the glue is completely hardened tho. But since it dries so quickly, it means very little waiting to build more.
Epoxy is the glue when I need a very strong joint. I always use 30 minutes epoxy, since the shorter time types are not strong enough. Epoxy is also perfect to fill cracks and uneven joints. It is possible to sand epoxy, but is is slightly flexible and not perfect for that.
My initial plan was to use a Thundertigre G-4500 for this model, but after rethinking and reading about the plane, I have changed my mind. The plane need a smaller engine. Most of the problem is wheight. The plane is already on the heavy side and adding a heavy engine will not help. Hence the Supertigre G-4500 with 45ccm and 4.5 bhp will have to go for a more suitable engine, a Thundertigre G-2300 with 3.8bhp.
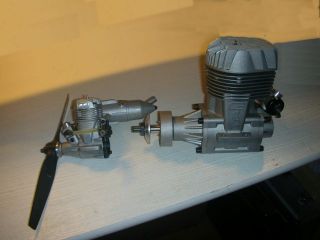
I have to add one picture here, just to show you the size difference from the OS 46LA
and the Super Tigre G-4500. The 45ccm G-4500 is massive! and 2kgs... so it
might be disqualified from the 27% Midwest Giles where I did plan to use it.
(Click the image to open a larger one for detail.)
Choice of engine:
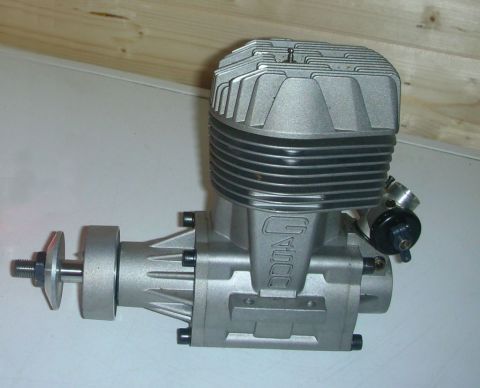
The Supertigre G-4500 is a massive engine. From the lump of 2 kg metal, the engine pumps out a massive 4.5 bhp for 8000 rpm on a 22" propeller.
It is a beautiful engine, and it has a very grunty sound. But not suitable for this kit, due to weight.
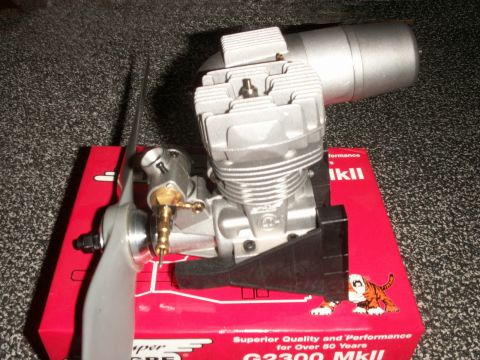
The Supertigre G-2300 is a large engine for giant scale planes. The engine produces 3.7 bhp on 12600 rpm. The engine has moderate weight with only 1077gram with muffler.
The choice for this kit will be the this engine.
The model will require a high landing speed if it passes 6 kg it will need higher landingspeeds. And it was really nothing which I wanted.
Pictures and build stages:
The kit comes in a relatively packed box.
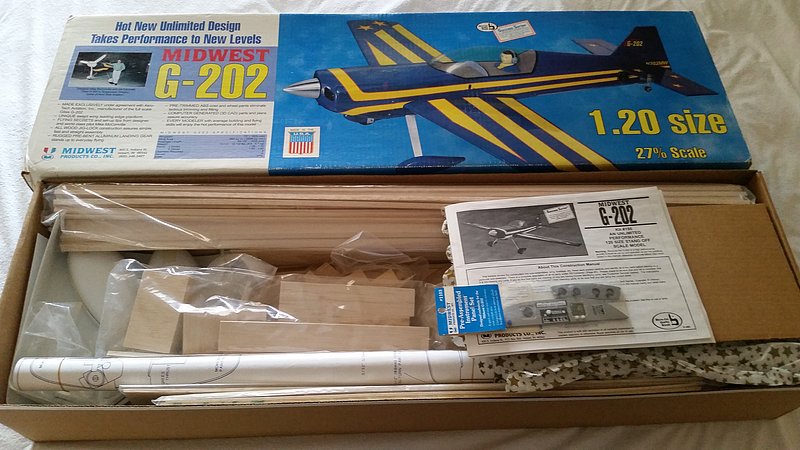
The balsa parts are of a relative good quality.
The balsa which came with the kit is of ok quality. But it is heavy, and this plane isnt lightweight at all. I plan to replace the sheeting balsa with contest grade balsa and save quite a few grams. The plastic parts which came with the kit is way to flimsy and need to be replace with fiberglass parts delivered from aftermarket suppliers such as Fiberglass Specialities which produce and seel fiberglass parts for quite a few models.
The Midwest Giles 202 will come out at 5500 grams. With that speed it will not do well at low speeds & l anding can be a handfull. The box states the plane to end up from 4800 to 5600 grams, probably depending on the motor.
After reading about the kit on various forums, this is my plan to make the plane lighter:
Scrap ALL the supplied sheeting in the kit and replace it all with Contest Grade balsa. CG Balsa weighed along side the stock supplied balsa it will be a weight savings of 255 grams. Sheeted the LE and TE of the wings, horizontal stab, my vertical fin and ailerons with CG Balsa.
Replace the spruce spars with heavy balsa and CF tape laminate to both top and bottom of the spars. to save about 90 gram. Replaced the turtledeck sheeting with CG Balsa instead of the 1/32" ply. Saves another 50 grams
Replace the front hatch 1/32" ply sheeting with CG Balsa, another 25 grams. Adding CF landing gear will save another Saved 140 gram. Buy fiberglass cowl and wheelpants for it will save 170 grams.
Total savings is between 650 to 750 grams. Not bad for about $100 investment in extra stuff. (LG, Cowl, wheelpants, CG Balsa) The plane is still being framed. Try to find Contest Grade Balsa for the sticks in the elevators, stab, rudder, and fin will shave another few grams of the plane. Drilling 3/4 inch holes in the plywood former that makes the rear of the cockpit/the front of the turtledeck yet a few more.
Drill 3/4 inch holes in the sides of the fuse under the front hatch area. The rear hatch former of plywood don't seem necessary, so replace it with 3/32 inch balsa. It'll be covered by the canopy when the model is finished, no need for ply under that area. The fuse is plenty strong enough to hold together without that piece of ply.
Use a dremel and a sanding drum to the rest of the fuse. Mostly in the TAIL section behind the wing saddle. This to avoid it to come out tail heavy. Try to remove as much unneeded weight in the tail as possible. Nose-heavy planes are EASY to fix. Tail-heavy is NOT easy to fix. The piece of ply under the turtledeck and on the top of the fuse is an area where where a lot can be removed with the dremel. It's a BIG piece of ply and it's not really necessary that it be so rigid under the turtledeck. Will try to dremeled the sides of the fuse behind the wing saddle also.
Increase the cord of the ailerons by about 15%. Just cut a new notch in the ribs where the 1/8x1/4 balsa stringers are glued in place. A bit of work but the ailerons will be bigger. For 3D flying, your better off to have a large control surface and only deflect it as much as you need, rather than a small control surface and trying to deflect it to max every time and stress the hinges and servos.
Increased the cord of the elevators by 1 inch. Increased the cord of my rudder by 3/4 inch. The Giles already has a very powerfull rudder so I don't think a radical change in cord was necessary. This plane will et most be flown in IMAC and simple aerobatics. It's not a 3D plane. Perhaps try some hovering with it, when my skills are up to it. It might do some simple 3D with the mods planned and the weight saved, but I'm not really building it for that. It's being built for basic IMAC maneuvers.
If I can manage to throw it around and do mild 3D with it, then great. But I just want a smooth, light flier for IMAC. Perhaps designe the plane with dual elevator servos in the tail and the rudder servo is still up for planning. Rudder servo location will be determined after it's almost comeplete. Plan is to use the rudder servo and engine to balance it.